Under the name medeaLAB Machine Vision, we offer you technically sophisticated imaging solutions for use in the laboratory or in production. For more than 20 years, we have been developing our own algorithms for image processing. Proven software modules, together with finished hardware components, form the basis of our medeaLAB Machine Vision image processing system.
Possible measurement parameters
Among other things, the following parameters can be determined:
Applications
The medeaLAB Machine Vision software is ideal for measuring, identification, counting and completeness control for different materials. It is used in various application areas as well as for testing components.
It is possible to analyse for example bulk solids including the evaluation of particle size distribution, length of fibers and the determination of shape parameters.
Our medeaLAB Machine Vision software in combination with line cameras is also suitable for non-contact and non-destructive monitoring of continuous material in real-time, such as testing of cables, foils, punched parts, etc. .
Our software also enables subpixel accurate measurement for product testing and classification in quality assurance or for use in the laboratory – all integrated into your operating schedule.
Further application examples of medeaLAB Machine Vision can be found here…

Figure: Position detection of a roof tile
Features
Smart Camera Systems
One or more Smart Cameras are usually used when the test task can be covered from the field of view of a camera (may be also by using deflection mirrors).
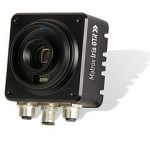
We only use the IRIS GT and MATROX IRIS GTR smart cameras from the reknown manufacturer MATROX Imaging.
Figure: Matrox Iris GTR
