Generation of a spermiogram with medeaLAB
Work with the database
The database comprises three sections. One section contains the personal data of the patients, the second the spermiogram data and the third the morphology data. You can switch between the respective mode Patient Data, Spermiogram Data and Morphology Data by using the menu options Database / patient data , Database / spermiogram data and Database / morphology data or by
Toolbar: ![]() View
patient data
View
patient data
![]() View spermiogram
data
View spermiogram
data
![]() View
morphology data
View
morphology data
If the morphology Button is always greyed you have a medeaLAB version without morphology.
Once the database is open, you can move through the data sets by using the menu options Database / First Record, Previous Record , Next Record and Last Record or using of the cursor arrows.
Symbol: ![]()
The Spermiogram Data-View“ shows the following data:
|
|
Headline: Native samples: System is in native sample mode. Name: Name of the actual patient. Date/ Time: Date and time of the measurement. Field/Total Fields: Actual field / Total number of fields . Spermiogram: medeaLAB offers the functionality to store up to 4 spermiograms for one patient. To change the actual spermiogram press button 1 – 4. Sample Volume: Enter the volume of the sample in this edit field. At the base of this value the concentration of the sample is calculated. Mean tracklength: The mean track length in this field. Result: The Results of the measurement for the actual field (Field) and the average value for all fields (Total). Sperm Conc. (Mio/ml): Concentration of the sample. This value is calculated on the base of the sample volume and the volume of the visible field of the optical system. Sperms Count: Number of processed objects. WHO a,b,c and d: Classification of the sperm movement due to the WHO-Criteria. See. Cap. 3.7. Motile, Local motile and Circle swimmer: Extensional Information of the sperm track classification. Open Track Window: Use the button open the actual track file. From this document you are allowed to analyse and export detailed track data. |
|
Fig. 4.2. The motility (spermiogram) database view |
|

For each patient several measurements can be performed in various fields. Measurements with native and processed samples are discerned. Switching between both sorts of samples is done by means of the options Database / Native and Database / Processed, respectively,
or by
Toolbar: ![]() native
samples
native
samples ![]() processed samples.
processed samples.
A single field can be deleted with Database / Delete Record.
Toolbar: ![]() Delete
Field
Delete
Field
|
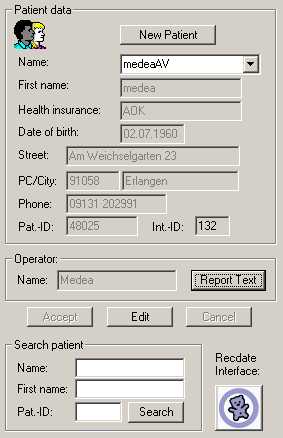
Fig. 4.1. The patient database view
|
Button New Patient: Create a new patient in the database. Edit all data and finish with “Accept”.
Name: Name of the current patient. Choose the name of the patient from the drop-down list by mouse click on the arrowhead.
You can edit the patient’s personal data after activation of the edit mode by use of the button Edit. Save your changes with the Accept button. If you want to cancel editing, use the option Cancel.
Report Text: This option opens the menu for editing the patient report texts.
Search patient: This function allows you to search a patient in the database by name, first name and patient ID.
Recdate: (Only for Germany) Using this import and export function, you can import patient data and export measurement data to the Recdate system. Transfer occurs on base of files. |
A new patient data can be created with the menu Database / Add record or pushing the button New Patient. A patient can be deleted with menu Database / Delete record.
Symbol: ![]() New
Patient
New
Patient
![]() Delete
Patient
Delete
Patient
When deleting a single field the corresponding track file (.fow) would be deleted automatically. But when manually deleting the data direct in the database or deleting patients completely the fow files are not deleted. To delete these unused fow files choose the function: Database / Delete All Not Used FOW Files.
The Morphology Data-View“ shows the following data:
|
|
Name: Name of the current patient.
Field/Total Fields: Current field / Total number of fields .
Sperms Count: Number of processed sperms (Field and Total).
Normal Sperms, Pathological Sperms, Anomaly Head, Anomaly Midpiece und Anomaly Tail: Number of sperms belonging to the class.
Save Image: the current image is stored as an JPEG-file with the name shown in the field on the right.
Learn Mode: Learn mode is activ. All objekts which are classified manually are chosen to trainee the classificator.
Measure: Start a measurement.
Load Image: Loading a stored image |
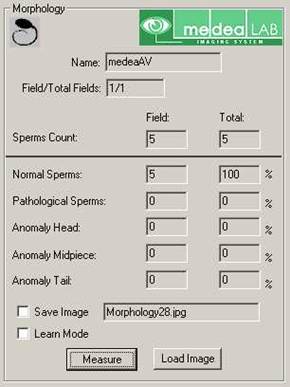
Fig. 4.3. Database window to present the morphology data
Start of a motility measurement
Start the measurement by pressing:
Toolbar: ![]() Start
Start
Wait until the system is ready.
Carrying-out a morphology measurement
medeaLAB CASA is able to classify sperm cells automatically. But first the system has to be trained by manually assigning cells to classes in the Learn Mode. Thus a statistical classificator is trained, which then classifies objects automatically.
Steps to train the classificator of a sperm morphology sample:
Activate the “Learn Mode” on the database view.
Push the button “Measure”

Fig. 4.4 Morphology measurement overview
Assign all objects found the correct class and choose the “Close” button.
Printing the report
The results of a measurement can be printed out as a report by choosing Record / Print report.
or on the toolbar:
![]() Print report
Print report
In the report all measurements of the patient are presented as mean values. Printing of the report is started by mouse click on the printer icon. The reports for native and processed samples, respectively, are printed after activation of the respective windows.
Changing the report template
You can change the report template using the menu: Database Report Options.
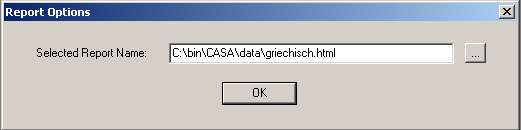
Fig. 4.5 Report Options dialog