
Configuration of the software
Base configuration
Before working with the program you have to select a path for storing the track files and to choose the format for spermiogram reports first. After the program is started choose the menu command: System / Options:
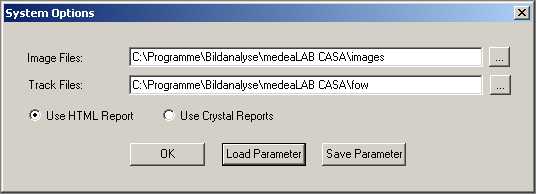
Type in a path to store the fow files (track information files) and the image files (e.g. morphology) or select an existing directory with the “…” button. If the directory does not exist it will be created automatically. Choose the format for report generation: HTML or Crystal Reports. Newer versions of medeaLAB CASA use the HTML report format which supports all languages and character sets.
Use the Buttons “Load Parameter” and “Save Parameter” to store or restore the complete system configuration in a “INI” file.
Note: After you have finished your complete system configuration it is very helpful to store a system configuration file for backup.
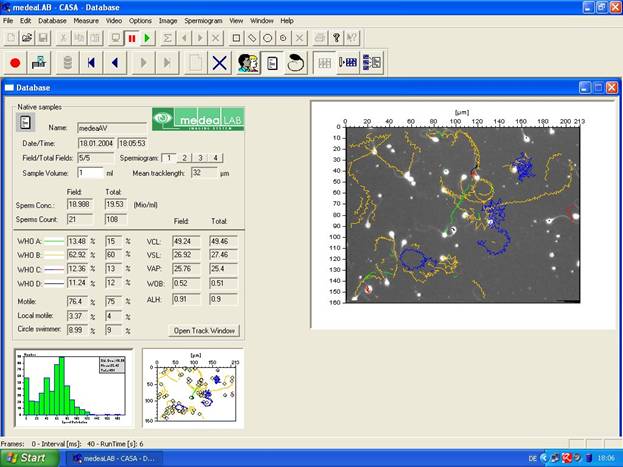
Open the database
Open the database by choosing the option Database / Open database or by
Toolbar: ![]()
Video initialisation and adjustment (Matrox METEOR II with PAL Camera)
If you do not have a analog video system with a Matrox Meteor II board please skip this chapter and continue reading at chapter 2.4.
Current interface version for Matrox Meteor II: fg32.dll – Version: 3.0.0.1 - File date: 2004-01-20
Video initialisation
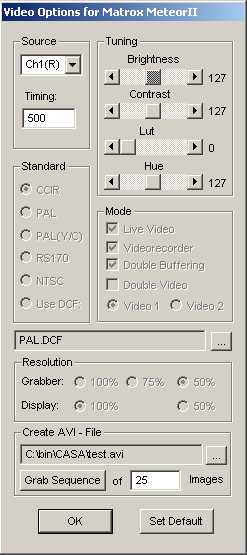
Settings of some video options such as Standard, Mode and Resolution have to be done before the video system is initialized. Choose the command Video / Options.
|
|
Source: Selection of the video channel[1]. Timing: Delay Time waiting for signal synchronisation while automatic channel changes.
Tuning: Brightness/Contrast: Setting of brightness and contrast of the video signal before digitalisation. Lut: Choose a predefined lockup table to transform the image for pseudo colour or inverse transformation (only B/W Mode CCIR or RS170). Hue: Red – Blue Adjustment (only colour mode).
Standard: Select the video norm for the used camera (see also text “Video Standards” below).
Mode: Live Video: Special data transfer mode depends on the use of the display adapter. Video recorder: Time base correction. Used only for older Meteor boards. Double Buffering: Asynchronous grabbing. An image is grabbed same time while the last grabbed image can be processed. Useful to perform real time processing of 25 Frames/sec. Double Video: Only used if multiple boards mounted in the computer
Resolution: Resolution of the grabber and the display 100% = 768 x 576 (european standard) or 640 x 480 (american standard). This settings are only available when the video is not initialized.
Create AVI – File: Writing an image sequence as an AVI - File to the disk. Type in file name and number of images and press Grab Sequence. It is necessary to reserve enough RAM for the Matrox MIL system. If you have not enough memory reserved you get an error message and you have to decrease the number of frames. For details see MIL configuration below. |
Video Standards:
CCIR: European video norm (b/w)
PAL: European video norm (colour)
PAL (Y/C) European video with Y/C (colour)
RS170: American video norm (b/w)
NTSC: American video norm (colour)
Use DCF Use a special Matrox format file to initialize the frame grabber. The DCF Files are available on the installation CD in the directory: MIL6.1\Matrox\drivers\meteor_II\dcf.
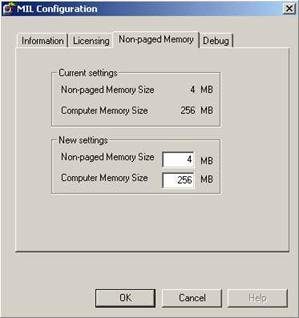
MIL configuration (Only for advanced users and technical service):
To reserve enough RAM memory for the MIL system (Non paged memory) start the tool MILConfig.exe. You find this tool on the installation CD in the directory: MIL6.1.
|
|
New settings: Increase the Non-paged Memory Size according to your video sampling needs.
For example: With grabber resolution 50% (half frames) and video standard CCIR (b/w) for a sequence of 30 frames which is a little more than one second you need 3.245 MB memory.
Warning: Do not reserve too much memory from your system. Leave min. 64 MB for the operating system otherwise Windows will not boot next time. |
Standard settings for CASA:
(Video ) Standard: CCIR for Motility measurements- PAL for Morphology measurements
(Video) Mode: Live Video – on
Video recorder – on
Double buffering – on Important for Motility!
Double video – off
Resolution Grabber 50% (half frame)
Display 100%
Note: All these settings have to be done before the video is initialized.
To initialize the video system choose either in the menu Video / Init.
or in the toolbar: ![]()
After initialization the video window shows up (possibly with a short delay). You can switch in the menu Video between the continuous grabbing mode (Continuous grabbing = live video) and the snapshot mode (Snapshot = freeze video). Select the continuous grabbing mode to focus the microscope image.
Toolbar: ![]() Continuous grabbing
Continuous grabbing ![]() Snapshot
Snapshot
Video adjustment (gain and offset) and grabber functions:
Before working with the system for the first time or when you have changed the optical system you have to set video gain and offset. Choose menu command Video / Options. To view the result of the settings the video grabber has to be in continuous grabbing mode. Change the gain and offset settings until you get an image of high contrast so that the objects appear very clearly separated from the background. After this adjustment please check also grey thresholds (see also chapter 3.2).
Video initialisation and adjustment (digital system)
If you do not have a a digital system with a FireWire camera please skip this chapter and continue reading at chapter 3.
Current interface version for FireWire camera: fg32.dll – Version: 2.0.2.0
Video initialisation
To initialise the video system choose either in the menu Video / Init.
or on the toolbar: ![]()
After initialisation the video window shows up in the default resolution of the video device (possibly with a short delay). Then switch to live video mode using the menu item Video / Continuous grabbing
or on the toolbar: ![]()
Adjustment and video functions
Before working with the system for the first time or if you have changed the optical system check all video settings. To view the result of the settings immediately the video device has to be in continuous grabbing mode.
Choose the menu command Video / Options.
|
|
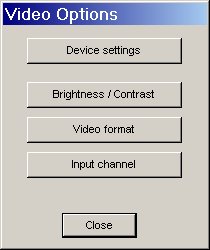
Choose one of the following dialogs:
Device settings: Device selection, video file capture |
|
Brightness / Contrast: All image settings |
|
|
Video format: Resolution, pixel format, frame rate |
|
|
Input channel: Select input channel (not for FireWire cameras, only available if your device has more than one channel) |
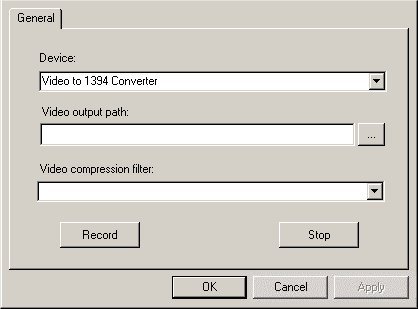
The Device settings dialog
|
|
Device: Choose the video input device if more than one devices are connected to your computer. |
|
Video output path: Type in the path and filename of the video file you want to record (or select a path with the “…” button). |
|
|
Video compression filter: Select a compression filter installed on your system from the list. If left blank an uncompressed video file will be recorded. |
|
|
Record: Starts recording to the specified file. Stop: Ends recording and closes the video file. |
Tips for video recording:
First switch to live video (Continuous grabbing), then open the Device Settings dialog. This way you can watch the video before and during recording (preview). The preview may show only fewer frames during recording than the recorded file (depending on the codec and the performance of your system).
The result of video recording also depends on the performance of your system (CPU, harddisk), if you notice dropped frames viewing the file, try another compression filter or reduce the video size (Video Options / Video format).
Some compression filters (Video Codecs) are not suitable for realtime recording at all because they need too much time for compressing single frames. Suitable Codecs are e.g. the MJPEG Compressor or the DivX Codec.
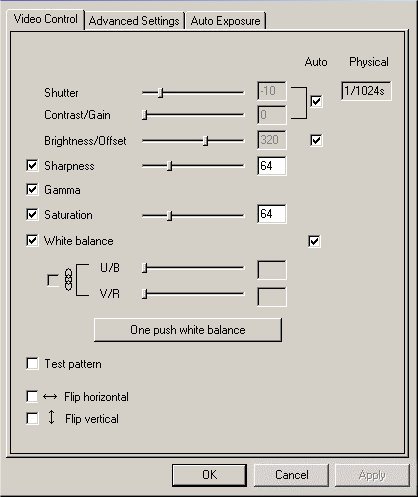
The Brightness / Contrast dialog
The appearance of this dialog depends on your video device. Below the dialog for the DFK 21F04 camera is shown. Besides brightness and contrast you can change colour settings, flip the video image and improve exposure time. For the most parameters the Auto setting is sufficient. Note that if you change one of the settings you will have to adjust grey/colour thresholds and object form parameters again.
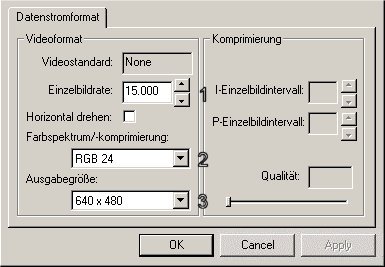
The Video format dialog
The appearance of this dialog depends on your video device. Below the dialog for the DFK 21F04 camera is shown.
|
|
1 – Frame rate: Frame rate used for video file recording, available frame rates depend on your device.
|
|
|
2 – Pixel format: Size and bit pattern of video pixels. For image analysis you can only use RGB 24 (24 bits per pixel) or RGB 32 (32 bits per pixel).
|
||
|
3 – Video output size: For most cases you can use the largest available size (640 x 480 or 768 x 576). |
||
|
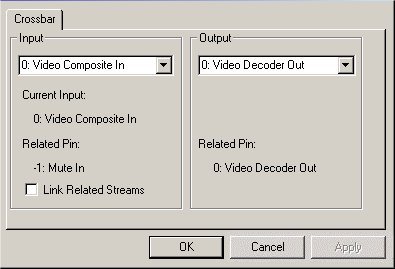
The Input channel dialog
This dialog is only available if your video device supports more than one input channels, it is not available if you use a digital (FireWire or USB) camera. Below the dialog for the Video To 1394 Converter is shown (converts analog video sources to digital video).
|
|
Input: Select the input channel of the device (connected to analog camera or VCR).
Output: Select the output channel of the device (connected to the computer, normally the device has only one output channel). |
Video file selection and initialisation (File version)
The File version allows to read the video images out of video files of type AVI. If you do not have installed the File version please skip this chapter and continue reading at chapter 3.
Current interface for File version: fg32.dll – Version: 2.2.0.1 - File date: 2004-01-21
The selection of a video file has do be done before the video is initialized. Choose the command Video / Options.
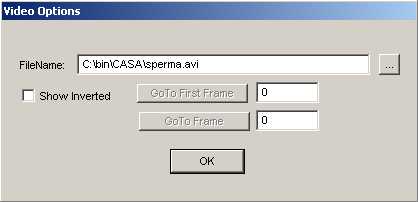
Type in a filename with path or select the “…” button to search a file.
You may also select a partial sequence of the video file here after video initialization (see below).
To initialize the video system choose either in the menu Video / Init.
or in the toolbar: ![]()
After initialization the video window shows up. You can switch in the menu Video between the continuous grabbing mode (Continuous grabbing = playing video file in a loop) and the snapshot mode (Snapshot = still image).
Toolbar: ![]() Continuous grabbing
Continuous grabbing ![]() Snapshot
Snapshot
After initialization of the video you can use the “Video Options” dialog to navigate through the video file using the buttons GoTo First Frame (starting frame) or GoTo Frame (last frame).